User Guide
For maximum flexibility, the workflow is controlled by modifying the variables contained within a runfile.
A template.runfile is packaged within the source repo, and one can simply change the respective variables according to analysis needs. The coming sections explain the possible options in details.
Runfile Options
Different options are available by setting the variables below. Ordering is, of course, irrelevant in this context, but the workflow is sensitive to spelling, so variable names should be identical.
| Variable | Effect and meaning |
|---|---|
SAMPLEINFORMATION |
It is necessary that no empty line is inserted at the end of this file |
OUTPUTDIR |
|
TMPDIR |
The path to where temporary files will be stored (See Output directories and files generated from a typical run of the pipeline) |
REALIGN |
YES if one wants to realign before recalibration, NO if not. |
SPLIT |
YES if one wants to split-by-chromosome before calling variants, NO if not. |
PROGRAMS_PER_NODE |
IMPORTANT NOTE
|
CORES_PER_NODE |
|
EXIT_ON_ERROR |
|
ALIGN_DEDUP_STAGE |
|
CHR_SPLIT_STAGE |
|
VC_STAGE |
|
COMBINE_VARIANT_STAGE |
|
JOINT_GENOTYPING_STAGE |
|
PAIRED |
0 if reads are single-ended only; 1 if they are paired-end reads |
ALIGNERTOOL |
Tool for the alignment stage. either: BWAMEM or NOVOALIGN |
MARKDUPLICATESTOOL |
Tool for marking duplicates. either: SAMBLASTER, PICARD, or NOVOSORT |
BWAINDEX |
the location of the index file |
NOVOALIGNINDEX |
|
BWAMEMPARAMS;
NOVOALIGNPARAMS |
Note: There is no space between the ‘=’ character and your parameters Note: Do not set the thread count or paired/single-ended flags, as they are taken care of by the workflow itself |
CHRNAMES |
List of chromosome/contig names separated by a
|
NOVOSORT_MEMLIMIT |
|
MAP_CUTOFF |
The minimum percentage of reads that were successfully mapped in a successful alignment |
DUP_CUTOFF |
The maximum percentage of reads that are marked as duplicates in a successful sample |
REFGENOME |
Full path to the reference genome
|
DBSNP |
Full path to the dbsnp vcf file (GATK assumes that this file is indexed) |
INDELDIR |
|
JAVAEXE |
Full path of the appropriate executable file |
BWAEXE |
|
SAMBLASTEREXE |
|
SAMTOOLSEXE |
|
NOVOALIGNEXE |
|
NOVOSORTEXE |
|
PICARDJAR |
Full path of the appropriate jar file |
GATKJAR |
|
JAVA_MAX_HEAP_SIZE |
|
Running the Pipeline
Requesting Resources from the Job Scheduler
Swift-T works by opening up multiple “slots”, called processes, where applications can run. There are two types of processes this workflow allocates:
SERVERS- Control the execution of Swift-T itself; all Swift-T applications must have at least one of these.WORKERS- Run the actual work of each application in the workflow; these will make up the vast majority of processes
Controlling various aspects of the job submission is achieved by setting
environment variables to the desired values. For example, the user can
fine control the total number of processes needed by setting
PROCS=<Number of MPI processes>, and/or the number of workers via
TURBINE_WORKERS and the number of servers via ADLB_SERVERS.
Similarly, one can specify QUEUE, WALLTIME and PROJECT
specifications. More coverage of these is provided in the Swift/T sites
guide.
Other options allow control of logging options. Especially for users
unfamiliar with Swift/T, we recommend always setting the environment
variable ADLB_DEBUG_RANKS=1 and checking the beginning of the
Swift/T log to be sure processes are being allocated as the user
expects.
Often when we use a cluster we set the PPN variable to the number of
cores on each node. Swift/T will allocate PPN processes on each node.
Normally, we set PPN to the number of cores for maximal concurrency,
although the PPN setting can be used to over- or under-subscribe
processes. For example, an application that is short on memory might set
a lower PPN, where an I/O intensive application might set a higher PPN.
For convenience, we recommend setting all such environment variables in a file, and then adding it to the Swift/T command. This is shown in the sections below for different schedulers (PBS Torque (general), Cray System (Like Blue Waters at UIUC), SLURM based Systems (Like Biocluster2 at UIUC, and Stampede1/Stampede2 on XSEDE), Systems without a resource manager:).
Executing the Swift-T Application
If using multiple nodes, one should set the SWIFT_TMP to another
location besides the default /tmp, that is shared by all of the
nodes
For example, export SWIFT_TMP=/path/to/home/directory/tmp
The type of job scheduler dictates how one calls Swift-T will be seen in the sections below.
PBS Torque (general)
Usually, one can use swift-t’s built-in job launcher for PBS Torque
schedulers (calling swift-t with -m pbs)
$ cat settings.sh       # Conveniently, we save environment variables in settings.sh
export PPN=<PROGRAMS_PER_NODE>
export NODES=<#samples/PROGRAMS_PER_NODE + (1 or more)>
export PROCS=$(($PPN * $NODES))
export WALLTIME=<HH:MM::SS>
export PROJECT=<Project ID>
export QUEUE=<queue>
export SWIFT_TMP=/path/to/directory/temp

# (Optional variables to set)
export TURBINE_LOG=1
export ADBL_DEBUG_RANKS=1
export TURBINE_OUTPUT=/path/to/output_log_location

$ swift-t -m pbs -O3 -s settings.sh \
  -o /path/to/where/compiled/should/be/saved/compiled.tic \
  -I /path/to/Swift-T-Variant-Calling/src/ \
  -r /path/to/Swift-T-Variant-Calling/src/bioapps \
  /path/to/Swift-T-Variant-Calling/src/VariantCalling.swift \
  -runfile=/path/to/your.runfile
This command will compile and run the pipeline all in one command, and the flags used in this call do the following:
-O3Conduct full optimizations of the Swift-T code during compilation (Even with full optimizations, compilation of the code takes only around 3 seconds)-m pbsThe job scheduler type, pbs torque in this case-s settings.shThe file with environment variables’ settings for the scheduler-oThe path to the compiled swift-t file (has a .tic extension); on the first run, this file will be created.-IThis includes some source files that are imported during compilation-rThis includes some tcl package files needed during compilation-nThe number of processes (ranks) Swift-T will open for this run of the workflow (this overrides the PROCS specification above, so I’m not sure we should use both – ask/advise)-runfileThe path to the runfile with all of the configuration variables for the workflow
PBS Torque (alternative)
If you need to import a module to use Swift/T (as is the case on iForge at UIUC), one cannot simply use the swift-t launcher as outlined above, since the module load command is not part of the qsub file that Swift-t generates and submits.
This command must be included (along with any exported environment variables and module load commands) in a job submission script and not called directly on a head/login node.
swift-t -O3 -o </path/to/compiled_output_file.tic> \
-I /path/to/Swift-T-Variant-Calling/src \
-r /path/to/Swift-T-Variant-Calling/src/bioapps \
-n < Node# * PROGRAMS_PER_NODE + 1 or more > \
/path/to/Swift-T-Variant-Calling/src/VariantCalling.swift \
-runfile=/path/to/example.runfile
It is important to note that (at least for PBS Torque schedulers) when
submitting a qsub script, the ppn option should be set, not to the
number of cores on each compute node, but to the number of WORKERS
Swift-T needs to open up on that node.
Example
If one is wanting to run a 4 sample job with PROGRAMS_PER_NODE set
to 2 in the runfile (meaning that two BWA runs can be executing
simultaneously on a given node, for example), one would set the PBS flag
to -l nodes=2:ppn=2 and the -n flag when calling the workflow to
5 ( nodes*ppn + 1 )
Cray System (Like Blue Waters at UIUC)
Configuring the workflow to work in this environment requires a little more effort.
Create and run the automated qsub builder
To get the right number of processes on each node to make the
PROGRAMS_PER_NODE work correctly, one must set
PPN= PROGRAMS_PER_NODE and NODES to
#samples/PROGRAMS_PER_NODE + (1 or more), because at least one
process must be a Swift-T SERVER. If one wanted to try running 4 samples
on 2 nodes but with PPN=3 to make room for the processes that need
to be SERVER types, one of the nodes may end up with 3 of your WORKER
processes running simultaneously, which may lead to memory problems when
Novosort is called.
(The exception to this would be when using a single node. In that case,
just set PPN=#PROGRAMS_PER_NODE + 1)
So, with that understanding, call swift-t in the following way:
$ cat settings.sh
export PPN=<PROGRAMS_PER_NODE>
export NODES=<#samples/PROGRAMS_PER_NODE + (1 or more)>
export PROCS=$(($PPN * $NODES))
export WALLTIME=<HH:MM:SS>
export PROJECT=<Project ID>
export QUEUE=<Queue>
export SWIFT_TMP=/path/to/directory/temp

# CRAY specific settings:
export CRAY_PPN=true

# (Optional variables to set)
export TURBINE_LOG=1    # This produces verbose logging info; great for debugging
export ADLB_DEBUG_RANKS=1   # Displays layout of ranks and nodes
export TURBINE_OUTPUT=/path/to/log/directory    # This specifies where the log info will be stored; defaults to one's home directory

$ swift-t -m cray -O3 -n $PROCS -o /path/to/where/compiled/should/be/saved/compiled.tic \
-I /path/to/Swift-T-Variant-Calling/src/ -r /path/to/Swift-T-Variant-Calling/src/bioapps \
/path/to/Swift-T-Variant-Calling/src/VariantCalling.swift -runfile=/path/to/your.runfile
Kill, fix, and rerun the generated qsub file
Swift-T will create and run the qsub command for you, however, this one will fail if running on two or more nodes, so immediately kill it. Now we must edit the qsub script swift produced
To fix this, we need to add a few variables to the submission file that was just created.
The file will be located in the $SWIFT_TMP directory and will be
called turbine-cray.sh
Add the following items to the file:
#PBS -V
# Note: Make sure this directory is created before running the workflow, and make sure it is not just ‘/tmp’
export SWIFT_TMP=/path/to/tmp_dir
export TMPDIR=/path/to/tmp_dir
export TMP=/path/to/tmp_dir
Now, if you submit the turbine-cray.sh script with qsub, it should work.
SLURM based Systems (Like Biocluster2 at UIUC, and Stampede1/Stampede2 on XSEDE)
As in the case with the pbs-based clusters, it is sufficient to only
specify the scheduler using -m slurm, and then proceed as above.
Additionaly, the same settings.sh file can be used, except that the
user can also instruct the scheduler to send email notifications as
well. The example below clarifies these:
$ cat settings.sh
export PPN=<PROGRAMS_PER_NODE>
export NODES=<#samples/PROGRAMS_PER_NODE + (1 or more)>
export PROCS=$(($PPN * $NODES))
export WALLTIME=<HH:MM:SS>
export PROJECT=<Project ID>
export QUEUE=<Queue>
export SWIFT_TMP=/path/to/directory/temp

# SLURM specific settings
export  MAIL_ENABLED=1
export  MAIL_ADDRESS=<the desired email address for sending notifications- on job start, fail and finish >
export TURBINE_SBATCH_ARGS=<Other optional arguments passed to sbatch, like --exclusive and --constraint=.. etc>

# (Optional variables to set)
export TURBINE_LOG=1    # This produces verbose logging info; great for debugging
export ADLB_DEBUG_RANKS=1   # Displays layout of ranks and nodes
export TURBINE_OUTPUT=/path/to/log/directory    # This specifies where the log info will be stored; defaults to one's home directory

$ swift-t -m slurm -O3 -n $PROCS -o /path/to/where/compiled/should/be/saved/compiled.tic \
-I /path/to/Swift-T-Variant-Calling/src/ -r /path/to/Swift-T-Variant-Calling/src/bioapps \
/path/to/Swift-T-Variant-Calling/src/VariantCalling.swift -runfile=/path/to/your.runfile
Systems without a resource manager:
For these system, specifying the settings.sh file as above doesn’t
really populate the options to turbine when using
Swift/T version 1.2. The workaround in such cases would be to export
the settings directly to the environment, and nohup or screen
the script launching the swift/t pipeline. Below is a good example:
$ cat runpipeline.sh
#!/bin/bash
export PROCS=$( PROGRAMS_PER_NODE * (#samples/PROGRAMS_PER_NODE + (1 or more)))
export SWIFT_TMP=/path/to/directory/temp

# (Optional variables to set)
export TURBINE_LOG=1    # This produces verbose logging info; great for debugging
export ADLB_DEBUG_RANKS=1   # Displays layout of ranks and nodes
export TURBINE_OUTPUT=/path/to/log/directory    # This specifies where the log info will be stored; defaults to one's home directory

$ swift-t -O3 -l -u -o /path/to/where/compiled/should/be/saved/compiled.tic \
-I /path/to/Swift-T-Variant-Calling/src/ -r /path/to/Swift-T-Variant-Calling/src/bioapps \
/path/to/Swift-T-Variant-Calling/src/VariantCalling.swift -runfile=/path/to/your.runfile

echo -e "Swift-T pipeline run on $HOSTNAME has concluded successfully!" | mail -s "swift_t_pipeline" "your_email"

$
$ nohup ./runpipeline.sh &> log.runpipeline.swift.t.nohup &
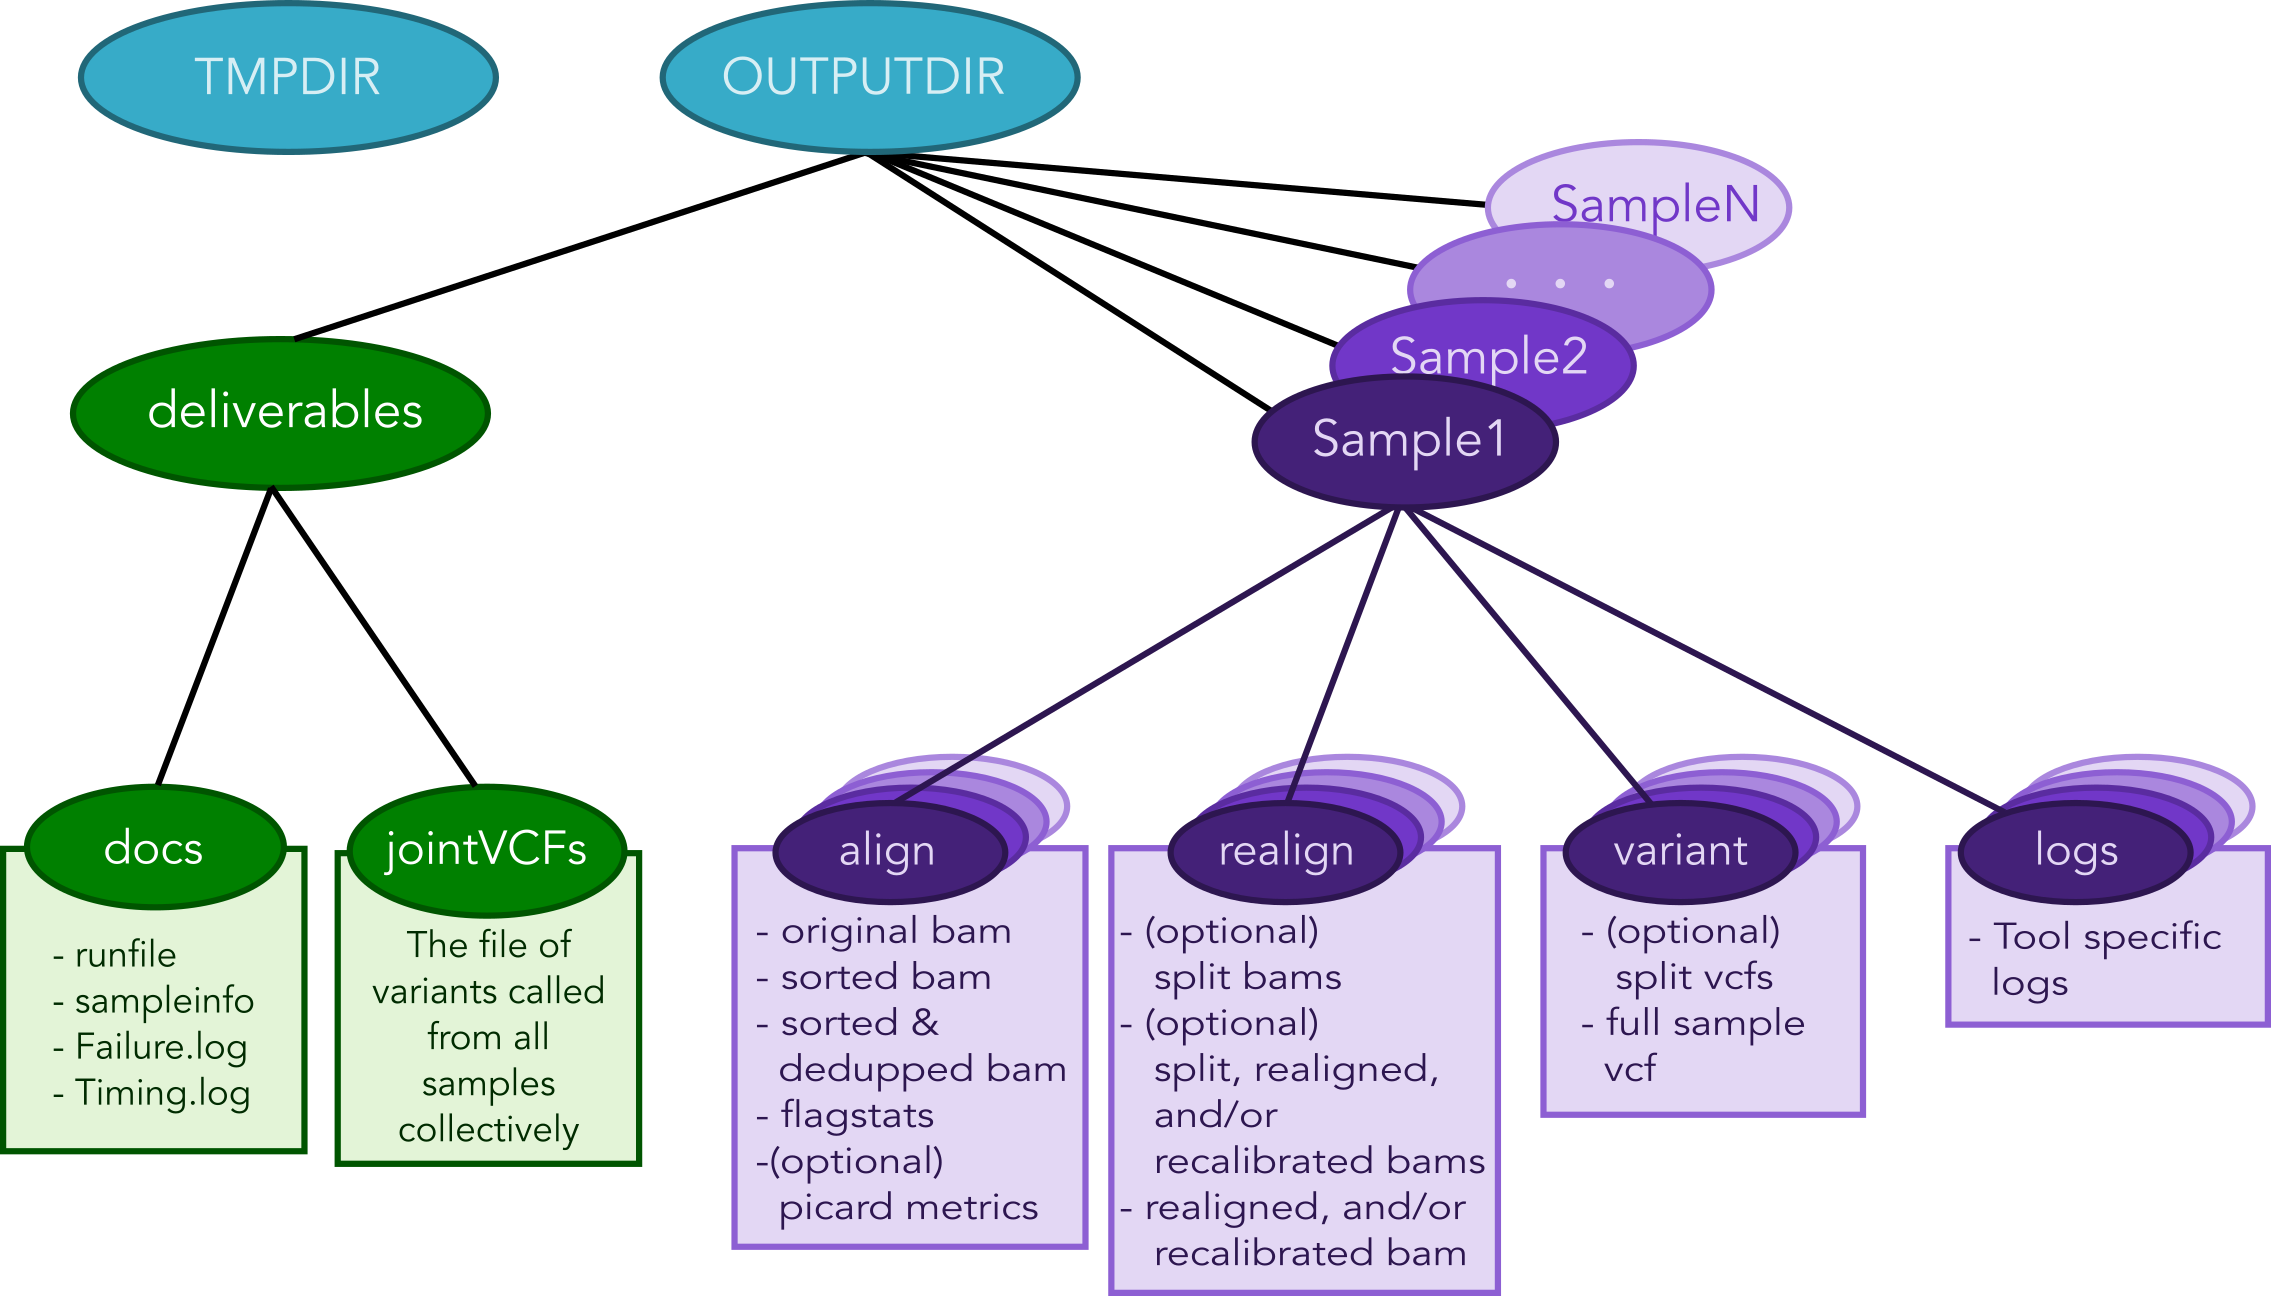
Output Structure
The figure below shows the Directory structure of various Output directories and files generated from a typical run of the pipeline
Output directories and files generated from a typical run of the pipeline
Logging functionality
Swift/T logging options
While the outputs generated by all the tools of the workflow itself will
be logged in the log folders within the OUTDIR structure, Swift-T
generates a log itself that may help debug if problems occur.
Setting the environment variable TURBINE_LOG=1 will make the log
quite verbose
Setting ADLB_DEBUG_RANKS=1 will allow one to be sure the processes
are being allocated to the nodes in the way one expects
Workflow logging options
The provided scripts allow you to check out the trace of a successful
run of the pipeline. To invoke it, and for the time being, you need R
installed in your environment along with the shiny package.
To do so, proceed as follows:
- Go to the R-project webpage, and follow the instructions based on your system
- Once the step above is completed and R is installed, open a terminal
window, type
R, then proceed as follows:
if (!require(shiny)) {
    install.packages('shiny')
    library(shiny)
}
runGitHub(repo = "ncsa/Swift-T-Variant-Calling", ref = "master",
          subdir = "src/plotting_app" )
The first time you run these commands in your system it will also
install some libraries for you in case you don’t have them already,
namely: lubridate, tidyverse and forcats.
Once all is done, a webpage should open up for you to actually take a
look at your trace files. For a taste of how things look, you may take a
look at the sample Timing.log file provided in the
repo
To take a look at your own analysis trace, you need to have a copy of
this branch first, Run it on you samples, and then find your own
Timing.log file within <OUTPUTDIR>/delivery/docs, where
OUTPUTDIR is specified as per the runfile. Simply
upload this file, and start using the app.
Important Notes
- To investigate a partial pipeline run, you may
catthe contents of all the small files in yourTMPDIR(See runfile options). In the example below, the contents of thid directory are catted to thepartial_run_timing.log, which is then uploaded to the logging webpage.
$ cd <TMPDIR> #TMPDIR is what has been specified in the runfile
$ find . -name '*.txt' -exec cat {} \; > partial_run_timing.log
- The overall summary tab of the logging webpage is handy in summarizing which samples, and which chromosomes have run successfully. It is easier to look at it when in doubt.
- Running this pipeline in its current form is expected to be more
expensive than normal, due to the manual logging involved. The
alternative is to use the native
MPElibrary (or equivalent), which requires re-compiling the Swift/T source. This approach is currently limited at the moment, but some discussions with the Swift/T team on this is found here
Data preparation
For this pipeline to work, a number of standard files for calling variants are needed (besides the raw reads files which can be fastq/fq/fastq.gz/fq.gz), namely these are the reference sequence and database of known variants (Please see this link).
For working with human data, one can download most of the needed files from the GATK’s resource bundle. Missing from the bundle are the index files for the aligner, which are specific to the tool that would be used for alignment (i.e., bwa or novoalign in this pipeline)
Generally, for the preparation of the reference sequence, the following link is a good start the GATK’s guidelines.
If splitting by chromosome for the
realignment/recalibration/variant-calling stages, the pipeline needs a
separate vcf file of known variants for each chromosome/contig, and each
should be named as: *${chr_name}.vcf . Further, all these files need
to be in the INDELDIR which should be within the REFGENOMEDIR
directory as per the runfile.
Resource Requirements
The table below describes the number of nodes each stage needs to achieve the maximum level of parallelism. One can request fewer resources if necessary, but at the cost of having some portions running in series.
| Analysis Stage | Resource Requirements |
|---|---|
| Alignment and Deduplication | \(Nodes = \frac{Samples}{PROGRAMS\_PER\_NODE}\) |
| Spliting by Chromosome/Contig | \(Nodes=Chromosomes*\frac{Samples}{PROGRAMS\_PER\_NODE}\) |
| Realignment, Recalibration, and Variant Calling (w/o splitting by chr) | \(Nodes = \frac{Samples}{PROGRAMS\_PER\_NODE}\) |
| Realignment, Recalibration, and Variant Calling (w/ splitting by chr) | \(Nodes=Chromosomes*\frac{Samples}{PROGRAMS\_PER\_NODE}\) |
| Combine Sample Variants | \(Nodes = \frac{Samples}{PROGRAMS\_PER\_NODE}\) |
| Joint Genotyping | \(Nodes = 1\) |
Notes:
- PROGRAMS_PER_NODE is a variable set in the runfile. Running 10
processes using 20 threads in series may actually be slower than running the 10 processes in pairs utilizing 10 threads each
- The call to GATK’s GenotypeGVCFs must be done on a single node. It
is best to separate out this stage into its own job submission, so as not to waste unused resources.
Pipeline Interruptions and Continuations
Background
Because of the varying resource requirements at various stages of the pipeline, the workflow allows one to stop the pipeline at many stages and jump back in without having to recompute.
This feature is controlled by the *_STAGE variables of the runfile. At
each stage, the variable can be set to Y if it should be computed, and
N if that stage was completed on a previous execution of the workflow.
If N is selected, the program will simply gather the output that
should have been generated from a previous run and pass it to the next
stage.
In addition, one can set each stage but the final one to End, which
will stop the pipeline after that stage has been executed. Think of
End as a shorthand for “End after this stage”.
Examples
If splitting by chromosome, it may make sense to request different resources at different times.
One may want to execute only the first two stages of the workflow with #
Nodes = # Samples. For this step, one would use these settings:
ALIGN_STAGE=Y
DEDUP_SORT_STAGE=Y
CHR_SPLIT_STAGE=End         # This will be the last stage that is executed
VC_STAGE=N
COMBINE_VARIANT_STAGE=N
JOINT_GENOTYPING_STAGE=N
Then for the variant calling step, where the optimal resource requirements may be something like # Nodes = (# Samples * # Chromosomes), one could alter the job submission script to request more resources, then use these settings:
ALIGN_STAGE=N
DEDUP_SORT_STAGE=N
CHR_SPLIT_STAGE=N
VC_STAGE=End                # Only this stage will be executed
COMBINE_VARIANT_STAGE=N
JOINT_GENOTYPING_STAGE=N
Finally, for the last two stages, where it makes sense to set # Nodes = # Samples again, one could alter the submission script again and use these settings:
ALIGN_STAGE=N
DEDUP_SORT_STAGE=N
CHR_SPLIT_STAGE=N
VC_STAGE=N
COMBINE_VARIANT_STAGE=Y
JOINT_GENOTYPING_STAGE=Y
This feature was designed to allow a more efficient use of computational resources.